
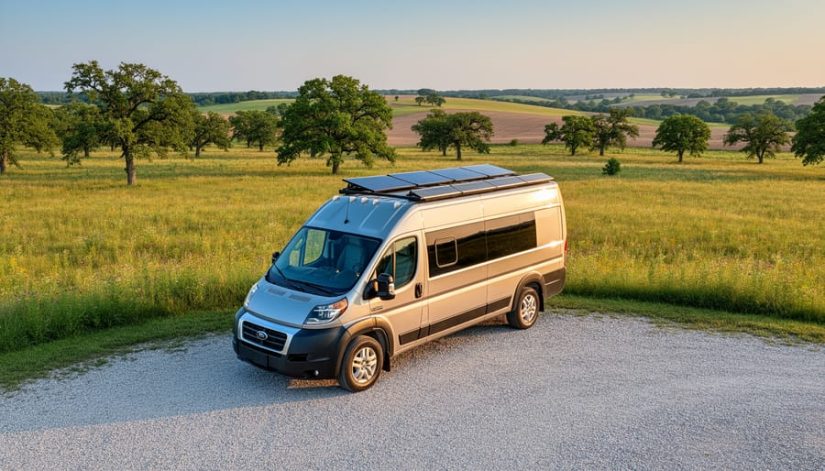
How Solar Power Can Turn Your Van Into an Energy-Independent Home on Wheels
Calculate your daily power consumption before purchasing any components by listing every device you’ll use in your van—from laptops and phones to refrigerators and fans—along with their wattage and hours of operation. This foundational step prevents the costly mistake of undersizing your system, which is particularly important for Illinois-based van travelers who face seasonal variations in sunlight availability, from abundant summer sun to shorter winter days that can reduce solar panel output by 40-50 percent.
Size your solar array between 200-400 watts for weekend warriors and 600-1200 watts for full-time van dwellers, pairing panels with a properly matched charge controller that protects your battery bank from overcharging. Lithium iron phosphate batteries have become the preferred choice over traditional lead-acid options, offering deeper discharge cycles, faster charging times, and better performance in the temperature fluctuations common to Midwest climates.
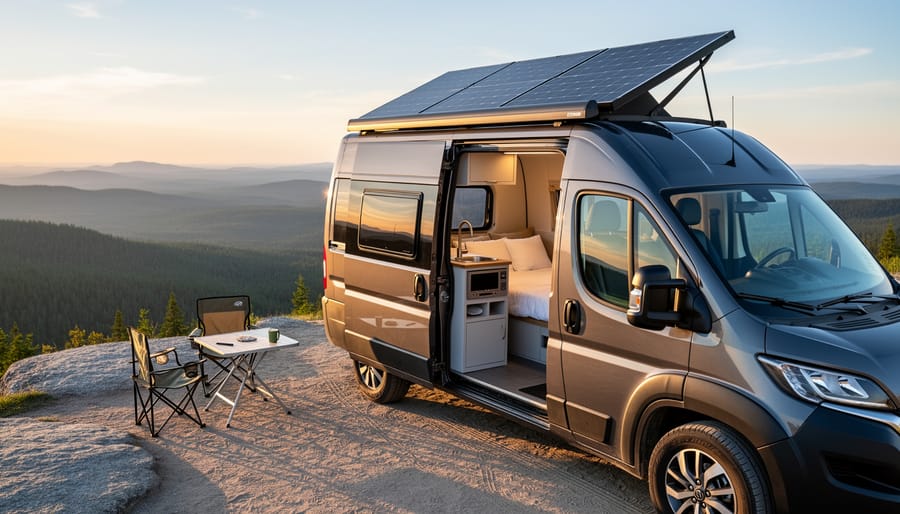
Plan your installation with roof space constraints and weight distribution in mind, mounting panels at a slight tilt when possible to shed rain and snow while maintaining aerodynamics. Professional installers typically charge between 1,500-3,000 dollars for complete system installation, though many van converters successfully complete DIY installations with basic electrical knowledge, proper safety precautions, and thorough research into electrical codes and best practices for mobile applications.
Why Van Solar Power Systems Make Sense for Illinois Adventurers
Freedom from Campground Hookups
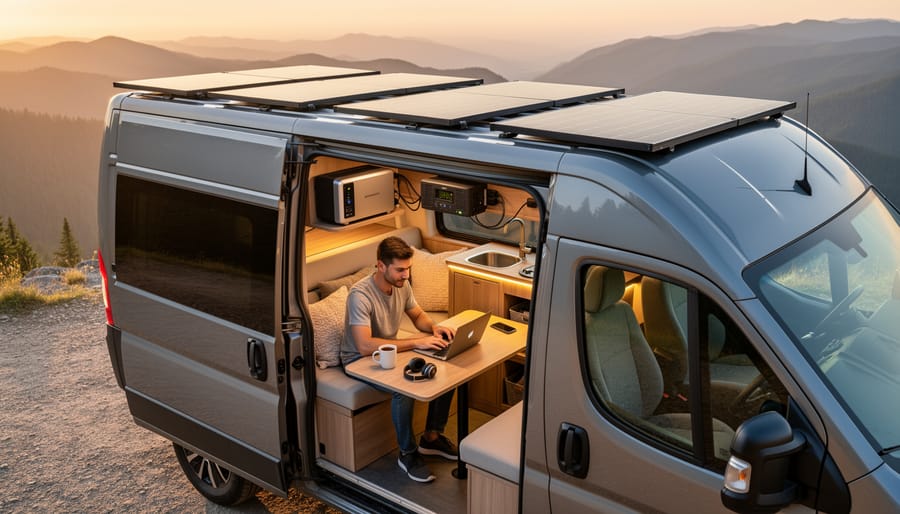
Solar power transforms your van into a completely self-sufficient home on wheels, eliminating the need to search for campground hookups or RV parks with electrical connections. With a properly sized solar system, you can park anywhere from remote forest roads to scenic overlooks while maintaining comfortable access to lights, refrigeration, charging devices, and even small appliances. This freedom means you’re no longer bound by nightly campground fees or limited by available hookup spots during peak travel seasons.
A well-designed van solar setup generates and stores enough energy to support your daily needs without idling your engine or running a noisy generator. Most vanlifers find that 400-800 watts of solar panels paired with adequate battery storage provides sufficient power for extended off-grid stays. During sunny conditions, your panels replenish your battery bank while you explore, ensuring you return to a fully charged system each evening.
This independence also extends your travel budget significantly. By eliminating the need for powered campsites, which can cost between thirty and sixty dollars per night, solar power pays for itself over time while granting access to free public lands and dispersed camping areas. The same expertise that helps Illinois residents achieve energy independence at home applies perfectly to mobile solar installations, making vanlife both practical and sustainable.
Long-Term Cost Benefits
While a van solar power system requires an upfront investment typically ranging from $2,000 to $6,000 depending on size and quality, the long-term savings become evident quickly for frequent travelers. Consider that RV campgrounds with electrical hookups charge $30 to $60 per night, which adds up to $900 to $1,800 monthly for full-time van dwellers. A properly sized solar system can eliminate these fees entirely, allowing you to enjoy off-grid camping at free or low-cost locations.
Generator users face ongoing fuel expenses as well. Running a portable generator costs approximately $5 to $10 daily in gasoline, plus maintenance and replacement costs every few years. Over just one year, fuel alone can exceed $1,800. In contrast, solar panels require minimal maintenance and typically last 25 years or more with reliable performance.
For those using their van conversion several months per year, most systems pay for themselves within two to three years. Full-time van residents often recoup their investment in under 18 months. Beyond the financial benefits, solar power provides energy independence and quiet operation, enhancing your overall travel experience without the noise and fumes associated with generators.
Essential Components of a Van Solar Power System
Solar Panels: Your Power Source
Selecting the right solar panels for your van roof requires balancing power output, space constraints, and budget. Two main types dominate the van life market: rigid and flexible panels.
Rigid panels, typically made with aluminum frames and tempered glass, offer the best efficiency and longevity. They’re more affordable per watt and can last 25+ years with minimal degradation. Most van conversions use monocrystalline rigid panels ranging from 100 to 200 watts each. These panels sit raised on mounting brackets, allowing airflow underneath that keeps them cooler and more efficient.
Flexible panels provide a low-profile alternative that can curve slightly to match your roof’s contour. They’re lighter and easier to install using adhesive mounting, making them popular for curved van roofs. However, they typically cost more per watt, generate more heat against the roof surface, and have shorter lifespans of 5-10 years.
For wattage considerations, most van systems range from 200 to 800 watts total. Calculate your daily power needs first, then size your array accordingly. Similar to portable solar solutions, mobile applications require careful planning to match generation capacity with consumption patterns, especially during Illinois winters when sunlight hours decrease significantly.
Battery Bank: Storing Your Energy
Your battery bank is the heart of your van solar system, storing energy collected during the day for use at night and on cloudy days. Understanding your options helps you make the right investment for your mobile lifestyle.
Lithium batteries, particularly lithium iron phosphate (LiFePO4), have become the preferred choice for van conversions. They’re lighter, last longer (often 3,000-5,000 charge cycles), and can be discharged deeper than traditional options without damage. This means you get more usable energy from a smaller, lighter package—critical when every pound and inch matters in a van.
AGM (Absorbed Glass Mat) batteries cost less upfront but typically last only 300-500 cycles and should only be discharged to 50% capacity. For occasional weekend trips, they’re budget-friendly. For full-time van life, lithium’s longevity justifies the higher initial cost.
Calculate your capacity needs by listing all devices you’ll power and their daily energy consumption in watt-hours. Add a 20% buffer for efficiency losses. A typical setup might range from 200 amp-hours for minimal use to 400+ amp-hours for running refrigerators, laptops, and other appliances.
Space constraints in vans require creative mounting solutions. Lithium batteries offer flexibility since they can be installed in various orientations, while AGM batteries need proper ventilation and upright positioning.
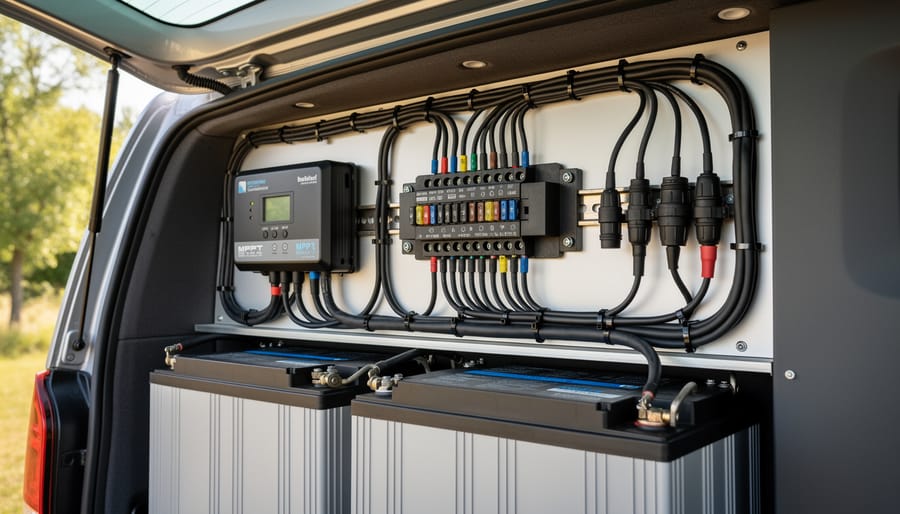
Charge Controllers and Inverters
Charge controllers regulate the power flowing from your solar panels to your batteries, preventing overcharging and damage. The two main types are PWM (Pulse Width Modulation) and MPPT (Maximum Power Point Tracking). PWM controllers are budget-friendly and work well for smaller systems, but they’re less efficient. MPPT controllers cost more upfront but maximize energy harvest, often converting 20-30% more power than PWM units—especially valuable during Illinois’s variable weather conditions.
Inverters convert your battery’s DC power into AC power for standard appliances. Sizing your inverter correctly is essential: add up the wattage of all devices you’ll run simultaneously, then add 20% for surge capacity. A 1,000-watt inverter handles most laptops and kitchen appliances, while larger systems may need 2,000-3,000 watts. Pure sine wave inverters are recommended over modified sine wave models, as they’re compatible with sensitive electronics and run appliances more efficiently, reducing overall power consumption in your van.
Wiring and Safety Equipment
Proper wiring is essential for both performance and safety in your van solar system. Use appropriately sized cables to handle the current your system generates—typically 10 AWG or larger for most connections. Always install inline fuses or circuit breakers between each major component, including between the solar panels and charge controller, battery bank and inverter, and anywhere positive cables connect. These protect against electrical fires caused by short circuits or equipment failure.
Install a battery disconnect switch that lets you completely isolate your system during maintenance or emergencies. Proper wire management keeps cables organized, prevents chafing against metal van surfaces, and ensures connections remain secure during travel. Use marine-grade tinned copper wire and heat-shrink connectors for corrosion resistance in the mobile environment. While van solar systems differ from residential installations, the same attention to electrical safety applies to any solar project.
Calculating Your Van’s Energy Needs
Assessing Your Daily Power Consumption
Understanding your daily power consumption is the foundation of designing an effective van solar power system. Before investing in panels and batteries, you need to calculate your actual energy needs in watt-hours, which will determine the size of your entire setup.
Start by listing every electrical device you plan to use in your van. For each appliance, identify its wattage (usually listed on a label or in the manual) and estimate how many hours per day you’ll run it. Multiply watts by hours to get watt-hours for each item, then add them all together for your total daily consumption.
Here are typical van life appliances with example calculations: A 12-volt refrigerator running continuously might use 40 watts for 12 hours daily, totaling 480 watt-hours. A laptop charging for 3 hours at 65 watts equals 195 watt-hours. LED lighting using 15 watts for 5 hours gives you 75 watt-hours. A vent fan operating 8 hours at 30 watts adds 240 watt-hours. This sample setup totals 990 watt-hours daily.
Many van lifers find smart energy monitoring tools helpful for tracking actual consumption versus estimates. Add a 20-25 percent buffer to your total to account for system inefficiencies and cloudy days. This final number becomes your target for solar panel output and battery capacity, ensuring you have reliable power wherever your travels take you.
Accounting for Illinois Weather Patterns
Illinois experiences significant seasonal sunlight variations that directly impact van solar system performance. During summer months, your panels may generate 5-6 peak sun hours daily, while winter can drop to 2-3 hours due to shorter days and lower sun angles. When sizing your system, plan for worst-case scenarios rather than optimal conditions.
The state’s frequent cloudy days mean your panels will produce 10-25% of their rated capacity during overcast conditions. To compensate, many van owners add 20-30% extra panel capacity beyond their calculated needs. This buffer ensures consistent power generation year-round.
Battery storage becomes especially important in Illinois. Size your battery bank to store at least 2-3 days of power consumption, allowing you to maintain electricity during extended cloudy periods common in spring and fall. Consider lithium batteries, which perform better in cold temperatures than traditional lead-acid options.
If you’re stationary in Illinois during winter months, angle-adjustable panel mounts can help capture maximum sunlight when the sun sits lower on the horizon. For year-round travelers, understanding these regional patterns helps you plan routes and manage energy consumption effectively during less productive solar seasons.
Installation Considerations for Van Solar Systems
DIY vs. Professional Installation
Deciding between DIY and professional installation depends on your technical skills, available time, and system complexity. If you have electrical experience and feel comfortable working with DC wiring, circuit protection, and basic tools, a DIY installation can save you hundreds to thousands of dollars in labor costs. Many van conversion enthusiasts successfully complete their own installations by following manufacturer instructions and online tutorials.
However, professional installation becomes valuable when working with larger systems, complex roof mounting, or if you lack confidence in electrical work. Professionals bring expertise in proper wire sizing, fuse placement, and troubleshooting potential issues before they become problems. While our team specializes in stationary solar installations across Illinois, the same electrical principles apply to mobile systems.
Consider a hybrid approach: handle the physical mounting and cable routing yourself, then hire an electrician to verify connections and complete the final hookup. This balances cost savings with safety assurance. Regardless of your choice, always prioritize proper grounding, use marine-grade components to withstand vibration and moisture, and never compromise on safety features like fuses and disconnect switches. Your local building codes may not apply to mobile installations, but following best practices protects both your investment and personal safety.
Roof Mounting and Weatherproofing
Properly mounting solar panels to your van roof requires careful planning to prevent water damage and maintain fuel efficiency. Start by selecting a mounting method appropriate for your roof type—whether corrugated metal, fiberglass, or aluminum. Most van owners use low-profile mounting brackets with adhesive sealants like Sikaflex or Dicor, which create waterproof bonds without drilling through the roof when possible.
If drilling is necessary to secure mounting feet, apply generous amounts of marine-grade sealant around each penetration point. This protects against Illinois’s varied weather conditions, from heavy summer storms to winter freeze-thaw cycles. Consider cable entry points carefully, using waterproof cable glands or roof pass-throughs designed specifically for this purpose.
Panel placement affects aerodynamics and efficiency. Position panels lengthwise along the van’s center, maintaining a low profile to minimize wind resistance and noise during highway travel. While some installers have expertise in stationary solar installations, van-specific mounting demands attention to vibration, movement, and weather exposure unique to mobile applications. Regularly inspect seals and mounting hardware, especially after long trips or severe weather events.
Working with Local Solar Experts
While van solar systems differ from traditional rooftop installations, locally owned Illinois solar companies bring valuable expertise to mobile applications. Professional solar installers can help you properly size your system based on your energy needs and travel patterns, ensuring you select components that work efficiently together. They understand local climate considerations, including how Illinois weather patterns affect solar production during different seasons, which is essential for planning extended trips.
These experts can also troubleshoot common issues like wiring problems, charge controller configuration, and battery management—areas where mistakes can be costly or dangerous. Many Illinois-based solar professionals offer consultation services for DIY van builders, providing guidance on proper installation techniques and safety compliance. Their experience with residential systems translates well to mobile setups, helping you avoid common pitfalls and maximize your investment in solar power for life on the road.
Real-World Performance: What to Expect
Power Generation in Different Seasons
Solar power generation in your van varies significantly throughout the year, especially if you’re traveling through or based in Illinois. During summer months, expect optimal performance with 5-6 peak sun hours daily, allowing your panels to produce near their rated capacity. A 400-watt system might generate 2,000-2,400 watt-hours on clear summer days.
Winter presents greater challenges. Illinois winters reduce daily production by 50-70% due to shorter days, lower sun angles, and frequent cloud cover. Your same 400-watt system may only produce 600-1,200 watt-hours during December and January.
To manage low-sun periods effectively, consider oversizing your solar array by 25-50% beyond your calculated needs. This provides buffer capacity during overcast conditions. Portable panels offer flexibility to supplement fixed roof installations when parked. Additionally, maintain realistic expectations about running high-draw appliances during winter months, and consider alternative charging methods like shore power hookups at campgrounds or an alternator charging system while driving. Proper battery capacity becomes essential, allowing you to store excess energy from productive days to cover shortfalls during cloudy stretches.
Maximizing Your System’s Efficiency
Getting the most from your van solar setup requires strategic planning and daily awareness. Start with panel positioning—mounting flat on the roof works for most travels, but tiltable mounts can increase production by 20-30% when stationary. Park with your van’s broadest side facing south during the day to maximize sun exposure, especially important during Illinois winters when sun angles are lower.
Reducing phantom loads dramatically extends your battery capacity. Devices like phone chargers, inverters on standby, and poorly designed LED lights can drain 5-15% of your daily power without you realizing it. Install battery disconnect switches for systems not in constant use, and choose appliances specifically designed for 12V DC operation to avoid inverter losses.
Smart energy management systems help you track consumption patterns and adjust accordingly. Run high-draw appliances like blenders or laptops during peak sun hours, and save low-power activities for evenings. Monitor your battery’s state of charge regularly, and avoid depleting lithium batteries below 20% to maximize their lifespan.
Costs and Return on Investment
Understanding the financial investment for a van solar power system helps you plan realistically and make informed decisions about your mobile energy needs.
Basic van solar setups start around $500 to $1,000, covering a simple 100-200 watt panel, charge controller, and modest battery bank suitable for charging devices and running LED lights. Mid-range systems with 400-600 watts of solar capacity, quality lithium batteries, and inverters for small appliances typically cost between $2,000 and $4,000. Comprehensive installations featuring 800+ watts of panels, large battery banks, and professional-grade components can exceed $6,000 to $10,000.
Several factors influence your total investment, including whether you choose DIY installation or professional help, battery technology selection (lithium batteries cost more upfront but last longer), and specific power requirements based on your planned usage.
While federal tax credits primarily apply to residential installations, many van owners structure their mobile solar systems to qualify for incentives when the vehicle serves as a primary residence. Check current IRS guidelines or consult a tax professional about potential deductions.
Calculating return on investment for mobile solar differs from traditional home installations. Instead of comparing against utility bills, consider savings from reduced campground electrical hookup fees, generator fuel costs, and the freedom to work or travel remotely without energy concerns. Most van dwellers report their systems pay for themselves within two to four years through these combined savings, while providing invaluable independence and flexibility for their mobile lifestyle.
Embracing a van solar power system opens the door to remarkable freedom, whether you’re exploring Illinois’ scenic byways or venturing across the country. These systems represent more than just a power source—they embody a commitment to sustainable living and energy independence that aligns perfectly with the growing renewable energy movement here in Illinois. The initial investment in quality components pays dividends through years of reliable, clean electricity that powers your adventures without compromising comfort or connectivity.
While the technical aspects might seem overwhelming at first, the fundamentals of solar power remain consistent whether installed on a rooftop or a van. The same principles of capturing sunlight and converting it to usable energy apply across all applications. For Illinois residents considering this transition, consulting with local solar experts can make the difference between a functional system and an optimized one. Professionals familiar with our regional climate patterns, seasonal sunlight variations, and specific energy needs can help design a personalized system that maximizes efficiency and reliability. As you plan your mobile solar setup, remember that locally owned solar companies bring valuable expertise that ensures your investment delivers the performance and independence you’re seeking on the open road.
